What is a dryer vent leak and why it matters
When warm, moist air from your dryer escapes the vent system before it reaches the exterior, you’ve got a dryer vent leak. It sounds minor, but the fallout isn’t: hidden moisture, mold-friendly conditions, higher utility bills, and even a heightened fire risk if lint accumulates where it shouldn’t. If you’re in NYC and want a pro to assess it, contact NYC dryer vent specialists for a quick check.
How a dryer venting system works
Your dryer heats and tumbles clothes, pushing humid air and lint through a lint screen into a metal duct. A blower forces that airstream through the vent run and out an exterior hood or cap. In a healthy system, joints are sealed air-tight, the run is short and smooth, and the termination has a backdraft damper that closes when the dryer stops.
Risks of a dryer vent leak for your home and health
- Moisture & mold: Escaping vapor elevates humidity inside walls, attics, and crawlspaces.
- Structural damage: Repeated wetting can stain drywall, swell MDF/trim, and rust fasteners.
- Fire risk: Leaks slow airflow, encouraging lint buildup that can overheat.
- Indoor air quality: Backdrafting can return lint and combustion byproducts (for gas dryers) into living areas.
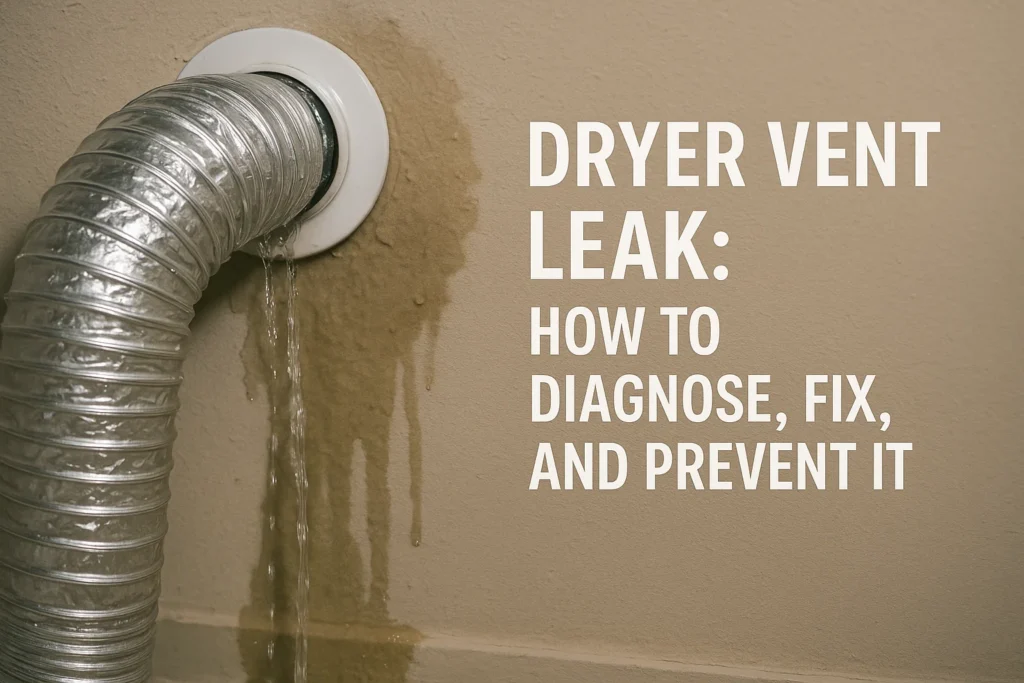
How to identify a dryer vent leak: symptoms and quick checks
Moisture stains, musty odor, and damp walls/ceilings
Yellowish rings, “ghosting” on drywall, or a persistent laundry-room funk are classic tells. Touch-test suspect areas after a drying cycle; if they feel cool and clammy, investigate the vent path nearby.

Condensation on the duct and backdraft
If the metal duct sweats during or after a cycle, warm air is meeting a cold surface—often due to leaks or missing insulation in unconditioned zones. Also check for a chilly draft from the wall box or exterior hood when the dryer is off; a stuck or missing damper can act like an open window.
Tripped alarms, higher energy bills, weak exhaust flow
Humidity sensors or smoke/CO alarms may trip more often. Bills creep up as drying times lengthen. Outside, the exhaust should feel strong and hot during operation; if it’s faint, suspect restrictions or leaks.
Prefer a technician to confirm what you’re seeing? Schedule a visit with a licensed dryer vent repair service in NYC.
Main causes of a dryer vent leak
Exterior termination issues (hood, cap, backdraft damper)
Cracked hoods, poorly seated caps, bird nests, or a damper that won’t close/open can trap moisture and blow it back indoors.
Loose joints and poor seam sealing
Unsecured slip joints or foil tape that’s aged out allow air to escape at every seam.
Excess length, too many elbows, lint buildup
Long, twisty runs slow the airstream. Add lint, and pressure rises until air forces itself out at the weakest point.
Wrong duct type: flexible foil vs rigid metal
Thin, accordion-style foil ducts snag lint and puncture easily. Smooth-wall rigid metal is far safer and more efficient.
Rain/snow intrusion and wind-driven backflow
Weather can push moisture through a damaged cap or one installed without proper orientation and drip edge.
No slope and low spots that trap condensate
Horizontal runs need a slight downhill pitch toward the exterior. Sags become “traps” where water collects and leaks out.
Diagnosis: confirming it’s truly a dryer vent leak
Tissue/smoke test and airflow measurement
With the dryer running, hold a tissue at joints—fluttering or suction gaps suggest leaks. A safe, canned smoke puffer can help visualize air movement. If you own an anemometer, check velocity at the exterior; unusually low readings point to restrictions.
When to use a thermal camera and moisture meter
After a hot cycle, scan walls/ceilings along the vent route. Cold streaks beside hot ducts or damp “bullseyes” often reveal hidden leaks. A pin or pinless moisture meter confirms elevated moisture content in drywall and framing.

Inspecting attic, crawlspace, and wall cavities
Follow the duct end-to-end. Look for staining near seams, rust, lint “frosting,” or water in low spots. In finished walls, remove the dryer box cover or a low-impact access panel to peek inside.
Not sure where to start? Book a diagnostic with professional dryer vent technicians in New York.
Temporary fixes vs a full repair
When tightening clamps or replacing foil tape is enough
Minor leaks at accessible joints can often be addressed by reseating the joint, tightening the band clamp, and re-taping with UL-listed foil tape (not cloth “duct” tape).
When you need full section replacement and rerouting
If the run is crushed, excessively long, or mostly flex foil, replace with rigid metal and simplify the path. Any section with corrosion, punctures, or persistent condensation should be swapped out.

Signs it’s time to call a pro
Recurring stains, mold, hidden runs through fire-rated assemblies, roof penetrations, or gas dryers with suspected backdrafting warrant professional diagnostics and repair. For safe, code-compliant work, consider a New York dryer vent leak repair.
Step-by-step DIY repair for a dryer vent leak
Tools and materials (rigid duct, elbows, clamps, mastic/foil tape)
- Rigid 4-in. metal duct & smooth elbows
- Short section of UL-listed flexible transition duct (dryer to wall box only)
- Band clamps, sheet-metal screws (short)
- UL-181 foil tape and water-based duct mastic
- Tin snips, crimper, drill/driver, level, moisture meter (optional), gloves & eye protection
Layout, cutting, and assembly with minimal elbows
Dry-fit from the dryer box to the exterior with the fewest elbows and shortest run. Cut square, insert male ends in airflow direction, and use 2–3 short screws per joint (avoid piercing both sides).
Sealing seams and pressure/testing for airtightness
Brush mastic on seams; tape over when tacky for belt-and-suspenders sealing. Run the dryer on hot: perform the tissue test at each joint and confirm strong outdoor exhaust.
Installing the right exterior cap with damper/screen
Choose a cap with a gravity damper that closes fully. Add a critter-guard screen designed for dryer use (no fine mesh that clogs with lint). Caulk the perimeter flashing; ensure a drip edge sheds water.
Post-repair test: hot cycle run and humidity check
After 10–15 minutes on high heat, verify warm, steady outdoor discharge, no drafts indoors, and stable room humidity. If results aren’t convincing, book a follow-up with a dryer vent service near you in NYC.
Typical leak scenarios and proven fixes
Leak at the connector behind the dryer
Cause: over-stretched flex or a loose clamp.
Fix: replace with a short, UL-listed transition duct; secure with band clamps and tape the wall-box collar.
Condensation leak in the attic run
Cause: uninsulated duct in a cold zone.
Fix: insulate the rigid duct with rated duct wrap; correct slope toward the exterior; remove sags.
Wall/roof penetration leak at the weather hood
Cause: failed caulk or cracked hood.
Fix: replace hood, add backer and high-quality sealant, confirm damper operation.
Water on the laundry room floor: vent leak vs plumbing leak
Rule out the washer first (supply/drain). If water appears only after drying cycles, track the vent path above—often a low spot is dripping down the wall cavity.
Prevention: how to avoid another dryer vent leak
Annual maintenance and lint removal checklist
- Clean the lint screen every load.
- Vacuum the wall box and accessible duct quarterly.
- Yearly: brush-clean the full run and the exterior cap—or schedule annual dryer vent maintenance in New York.
Limiting run length and number of turns
Keep the route direct. Each elbow adds resistance—plan the layout like a highway, not a maze.
Proper slope and insulating cold-zone sections
Pitch horizontal runs slightly toward the exterior and insulate ducts crossing attics, garages, or crawlspaces.
Keeping birds/insects out and screens clear
Use a purpose-built pest guard and check it quarterly; clear lint so the damper can swing freely.
Codes and best practices (essentials)
Recommended duct materials and diameter
Smooth-wall metal, typically 4-inch diameter, is the standard recommendation for most residential dryers. Avoid plastic and paper-thin foil ducts except for the short, listed transition piece.
Max (equivalent) length and no tying into shared vents
Follow your dryer manufacturer’s equivalent length limits (elbows count as extra “feet”). Don’t connect a dryer vent to bathroom fans, chimneys, or shared exhausts.
Safety: lowering fire and mold risk
A sealed, smooth, and short run evacuates lint and moisture quickly—less fuel for fire, fewer places for mold to take hold.
Cost and timing: what it takes to fix a dryer vent leak
DIY budget: parts, consumables, and tools
Rigid duct & elbows (modest), quality exterior cap (moderate), UL-181 tape & mastic (low), insulation wrap (low–moderate). If you need brushes or an anemometer, add those. If this feels like too much, request a quote from local dryer vent pros in NYC.

Contractor pricing: typical line items and what’s included
Expect line items for inspection/diagnostics, partial or full re-pipe, roof/sidewall cap replacement, insulation, and cleanup/testing. Complex reroutes or roof work add to the total.
When insurance may cover moisture damage
If a sudden leak caused visible water damage, ask your insurer; long-term maintenance issues are often excluded, but it doesn’t hurt to document and ask.
Dryer vent leak FAQ
How to tell condensation from a true leak?
Condensation forms droplets along cold duct runs and appears after cool-down; true leaks blow linty, warm, moist air from a specific joint during operation. A tissue test usually settles it. Not sure? Get a quick assessment from an NYC dryer vent technician.
Is plastic ducting ever acceptable?
No for permanent venting—plastic melts and fuels fire. Use listed, short transition duct only where manufacturer-approved.
Do I need a booster fan?
Only if the run length and elbow count exceed the dryer’s allowance and you can’t reroute. Size and install per the fan manufacturer, and make sure it’s serviceable.
What if the dryer is built into a tight closet?
Provide makeup air (louvered door or grille), ensure the vent route stays smooth and accessible, and use a recessed dryer box to prevent crushing the connector.
Quick response checklist if you suspect a dryer vent leak
10 actions in 30 minutes before a tech arrives
- Turn off the dryer.
- Pull it forward safely.
- Check and clean the lint screen.
- Inspect the connector and wall box.
- Tighten loose clamps.
- Do a quick tissue test at joints.
- Look for moisture stains or drips.
- Step outside—check damper movement.
- Lay towels to protect floors.
- Photograph everything you find.
Takeaways and next steps
Why you shouldn’t delay fixing a dryer vent leak
Every run adds moisture and risk. Waiting turns a cheap seal-up into repairs for drywall, trim, or insulation—and maybe the dryer itself.