
Content:
- Quick Answer
- Quick Dishwasher Leak Diagnosis
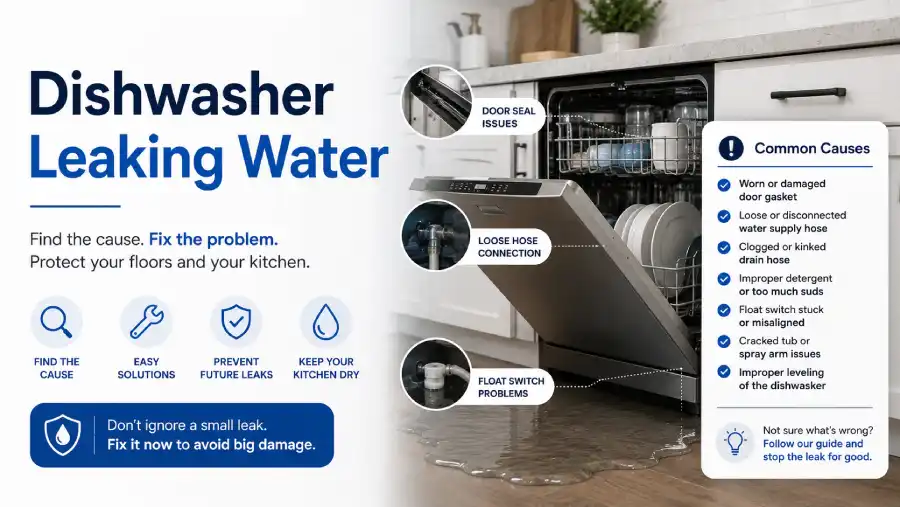
- Most Common Dishwasher Leak Causes
- How to Locate the Leak Fast
- DIY Dishwasher Leak Fixes
- Repair or Replace?
- Dishwasher Leak Prevention Checklist
- Frequently Asked Questions
- Professional Dishwasher Repair in New York
Quick Answer
Dishwashers usually leak because of damaged door gaskets, clogged filters, loose water supply lines, leaking inlet valves, blocked drain hoses, or worn pump seals. Small leaks often start near the door or underneath the appliance and can quickly damage flooring or cabinets if ignored.
A leaking dishwasher is one of the most common kitchen appliance problems. Sometimes the fix is simple, like cleaning a clogged filter or replacing a worn door seal. Other times, the leak may come from the pump, inlet valve, or drain system underneath the machine.
This guide explains the most common dishwasher leak causes, how to quickly diagnose the problem, and which repairs you can safely handle yourself before calling a professional technician.

Professional Appliance Service
Expert Dishwasher Repair in New York
Having problems with your dishwasher? Whether it won’t drain, leaks water, makes unusual noises, or fails to clean dishes properly, our experienced technicians provide fast and reliable dishwasher repair throughout New York.
✓
Same-day service available
Fast Repair
✓
Experienced certified technicians
Trusted Service
✓
All major brands serviced
Any Brand
This article was reviewed by experienced dishwasher repair specialists servicing Whirlpool, Bosch, GE, Samsung, KitchenAid, and Maytag dishwashers in residential homes across New York.
Quick Dishwasher Leak Diagnosis
| Leak Area | Most Likely Cause | Repair Difficulty |
|---|---|---|
| Bottom of door | Damaged door gasket or excess suds | Usually easy |
| Under dishwasher | Pump seal or water line leak | Moderate to expensive |
| Leak during drain cycle | Blocked drain hose or clogged filter | Usually easy |
| Leak when dishwasher is off | Leaking inlet valve | Moderate repair |
| Water at front corners | Improper loading or spray arm splash | Easy fix |
Most Common Dishwasher Leak Causes
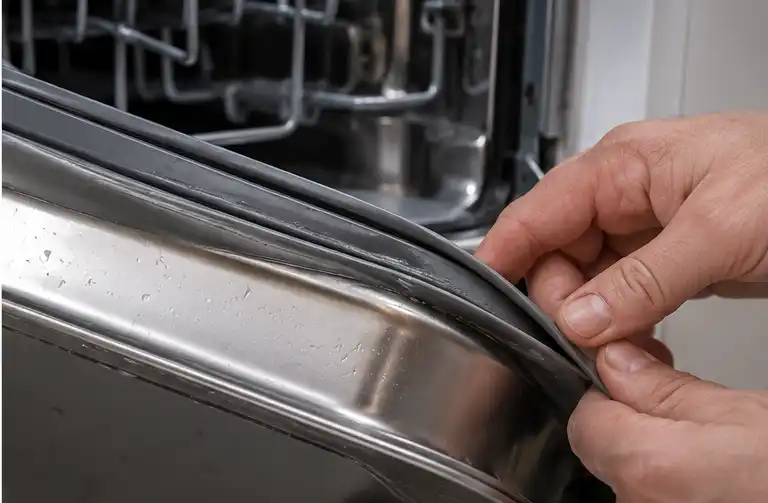
Door Gasket ProblemsA damaged or dirty door gasket is one of the most common reasons dishwashers leak from the bottom of the door.
|
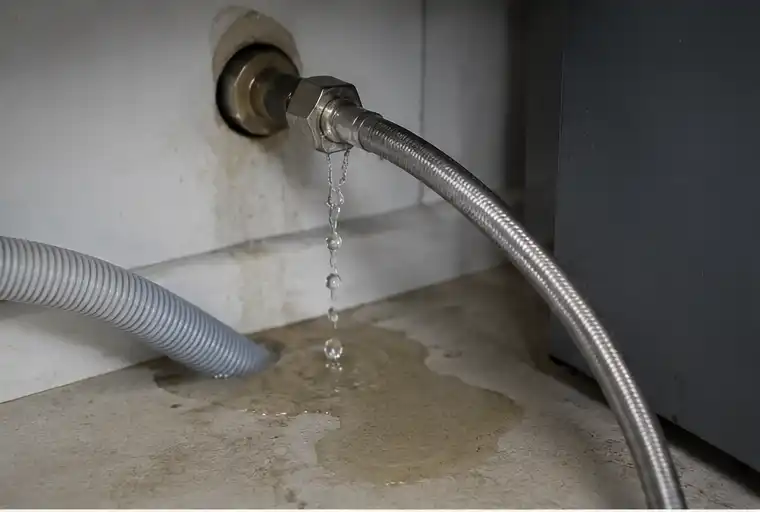
Water Supply Line LeaksLoose supply lines or leaking inlet valves often create puddles underneath the dishwasher.
|
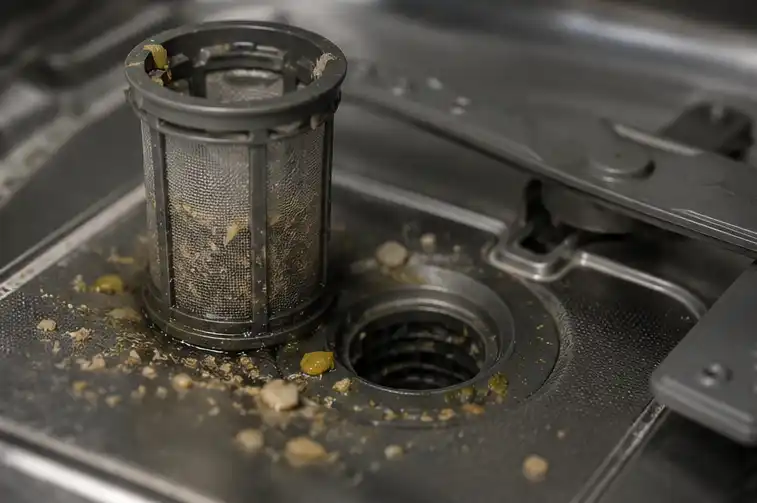
Clogged Filter or Drain HoseBlocked filters or kinked drain hoses commonly cause leaks during the drain cycle.
|
Pump Seal or Internal Component LeakLeaks from the center underside of the dishwasher often point to a worn pump seal or internal mechanical issue.
|
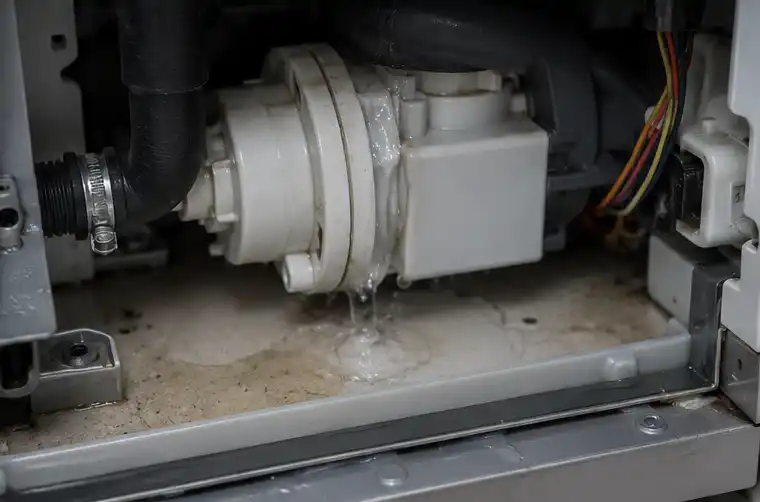
Professional Insight:
Based on appliance repair service data, damaged door gaskets and clogged drain systems are the two most common causes of dishwasher leaks in residential kitchens.
How to Locate the Leak Fast
- Check the front corners first.
Leaks near the bottom of the door usually indicate gasket or spray arm problems. - Remove the kick plate.
Inspect underneath the dishwasher for dripping hoses, pump leaks, or standing water. - Inspect the water supply line.
Look for moisture around fittings and inlet valve connections. - Run a short rinse cycle.
Watch carefully to see whether the leak appears during filling, washing, or draining. - Check the drain system.
Inspect the filter, sump, and drain hose for clogs or kinks.
DIY Dishwasher Leak Fixes
Safety First: Turn off power at the breaker and shut off the dishwasher water supply before attempting repairs.
1. Clean or Replace the Door Gasket
- Wipe debris from the gasket channel
- Inspect for cracks or flattening
- Replace brittle rubber seals
- Check if the door closes evenly
2. Fix Water Supply Line Leaks

- Tighten loose fittings carefully
- Inspect braided supply hoses
- Replace worn washers
- Check inlet valve for dripping
3. Clean the Filter and Drain System
- Remove and rinse the dishwasher filter
- Clear debris from the sump area
- Inspect drain hose for kinks
- Clean the air gap if installed
4. Reduce Excess Suds
- Use dishwasher detergent only
- Avoid overfilling detergent dispenser
- Do not use regular dish soap
- Reduce rinse aid if overfoaming occurs
Repair or Replace?
If your dishwasher is older than 10 years and continues leaking after multiple repairs, replacement may become more practical than ongoing repairs.
Minor leaks from filters, gaskets, or hoses are usually inexpensive to repair. However, pump failures, cracked tubs, and recurring internal leaks may become costly over time.
Dishwasher Leak Prevention Checklist
- Clean the filter monthly
- Inspect the door gasket regularly
- Check supply and drain hoses for wear
- Avoid overloading racks
- Use proper dishwasher detergent only
- Verify dishwasher leveling yearly
- Clean spray arms every few months
Frequently Asked Questions
Why is my dishwasher leaking from the bottom of the door?
Usually because of a damaged door gasket, excess detergent suds, or improper loading that redirects spray toward the door.
Can a dishwasher leak when it’s turned off?
Yes. A leaking inlet valve or slow water supply line drip may continue leaking even when the dishwasher is not running.
Will a clogged filter cause leaks?
Yes. A blocked filter or sump can restrict drainage and force water out during the drain cycle.
Is it safe to use a leaking dishwasher?
No. Water leaks may damage flooring, cabinets, and nearby electrical components if ignored.
Why does my dishwasher leak only sometimes?
Some leaks happen only during specific phases like filling or draining, making them harder to notice immediately.
Water leaks and drainage problems often occur together. If your appliance is also leaving water in the bottom after a wash cycle, see our complete guide on why your dishwasher is not draining and how to troubleshoot standing water, clogged drain hoses, and faulty drain pumps.
Professional Dishwasher Repair in New York
If your dishwasher continues leaking after basic troubleshooting, the issue may involve internal pump components, water valves, or electrical systems that require professional repair.
Schedule fast dishwasher repair service in New York


Maintenance Tip:
Cleaning dishwasher filters and checking hoses every few months can prevent many common dishwasher leak problems before they become serious.